1. The Powertrain: The Heart of Your E-Bike
Congratulations on entering the world of a DIY fat tire e-bike build! With sufficient preparation and a bit of skill, you are destined to create a ride fashioned entirely by your individual requirements. Unfortunately, that dream is quickly revealed to be the stuff of nightmares; your bike’s final cost can be anything but crystal clear. This guide goes far beyond component lists, breaking down costs across five fixed dimensions to provide you with a more realistic view. It can enhance your ability to budget your project accurately, make informed decisions, identify where and when to invest, and find areas to save. The powertrain is the core group of your motor, battery, and controller and your largest starting expense. Together, these elements will drive your e-bike experience and result in the largest financial commitment. Since battery capacity is often the most difficult-to-value component, it is among the few areas where the cost seems to be hidden. Tailoring all components into a powertrain system set is the only way to get a practical powertrain price. Since unnecessarily high power matches will not be included, investing wisely in power is the smartest move. However, purchasing a low-cost product might lead to a lasting risk and unsafe use.
Key Cost Factors for Powertrain:
Motor
Your primary choice is between a hub motor and a mid-drive motor.
Hub Motors: Less expensive and simpler to install, they come in front or rear hub configurations. Hub motors are mounted in the front or rear wheel hub and power the wheel directly. Geared hub motors provide an excellent balance of torque, weight, and price for most fat tire builds.
Mid-Drive Motors: More expensive and complex, mid-drive motors power the crankset and leverage your bike’s gears to deliver a more natural feel and superior climbing capacity.
Battery
The battery is often the single most expensive piece. Voltage and amp-hours determine the power and range of the battery.
Technique: Do not compromise on battery quality. Always buy from a well-known vendor that uses branded cells like Samsung, LG, or Panasonic. A cheap, unbranded battery is a great fire risk and will have a limited lifespan.
Controller
The “brain” that connects your battery and motor to the controls.
Technique: Choose a controller with a maximum amperage rating slightly higher than your motor’s continuous rating to prevent overheating and ensure performance under load. It should be rated for your system’s voltage.
2. The Foundation: Frame, Fork, and Wheels
The powertrain of the e-bike is underlined by its chassis, and in the case of a fat tire build, it is essential to find durable platforms which can withstand the additional mass and torque. This might be the cheapest part of your build, starting with a used bike or bike frame, or a brand-new frame engineered for your custom design. From the perspective of safety, a robust one is required, particularly since the battery and motor add significant mass. However, the specialized nature of fat bike components means they are often more expensive than their conventional counterparts, an aspect that impacts the budgeting in the first place. Factors influencing costs include:
Donor Bike/Frame
If you buy a bike, or just the frame.
Used bike: The cheapest option. Technique: When evaluating whether purchasing an aluminum alloy frame is worth it, inspect it for stress cracks around the headtube, the bottom bracket, and connection points. Steel is also a feasible alternative. The material is strong and may endure frequent impacts, but it is much heavier.
New frame: The other option. Technique: It needs to be undamaged.
Fork
Rigid or suspension.
Rigid: Cheaper, lighter, and does not require any maintenance. These are ideal for on-road and light off-road riding, but not technical trails.
Suspension: More expensive but also more comfortable, especially on rocky terrain. Technique: Check if it is compatible with the frame and if the offset and travel dimensions suit your needs.
Wheels and Tires
Fat bike-specific: Strong frames must resist system weight. Technique: Pay attention to the rear dropout spacing and form on the frame. It must cooperate with the motor wheel axle that you select. Torque arms are strongly recommended. They guarantee that the aluminum frame edge of each dropout does not spin out.

3. Cockpit, Drivetrain, and Braking System
While these components cost less individually than powertrain parts, the sum of all the small parts making up your cockpit and drivetrain reaches a pretty penny, too. These parts are your direct interactions with the bike, controlling its power and speed, so their quality is critical to your riding experience and safety. Brakes are a non-negotiable safety item. A heavy fat tire e-bike and a rider can rapidly build up significant momentum, and underpowered brakes are a disaster waiting to happen. Not spending enough of your budget on these parts is not just sacrificing performance; it is potentially compromising safety. Cost considerations for cockpit and drivetrain are presented below:
Cockpit Controls
This consists of the display, throttle, and PAS for pedal assist.
Display: A basic LED display is inexpensive; switching to an LCD-rich display that provides speed, battery level, and distance among other data is vital. Cost implication: A basic LED display is fairly cheap; rich displays provide valuable data but cost more.
Throttle: Throttle control can come in the form of a thumb or twist throttle, with the common options being relatively inexpensive and normally included in kits.
PAS sensor: The PAS will be a cadence sensor, which is a common and balanced pick. There are also torque sensors to detect pedaling force and provide a smoother, more intuitive power delivery at a higher cost.
Drivetrain
Derailleur, chain, and cassette/freewheel. Recommendation: For most e-bike conversions, a basic and robust 7-8 speed drivetrain will be more than enough. The motor provides the power, so you don’t need a wide gear range.
Brakes
Critical Equipment: Disc brakes are the absolute minimum for a fat tire e-bike: be sure to use large rotors, at least 180 mm, to offer sufficient stopping force.
4. The Pre-built Alternative: A Cost and Time Comparison

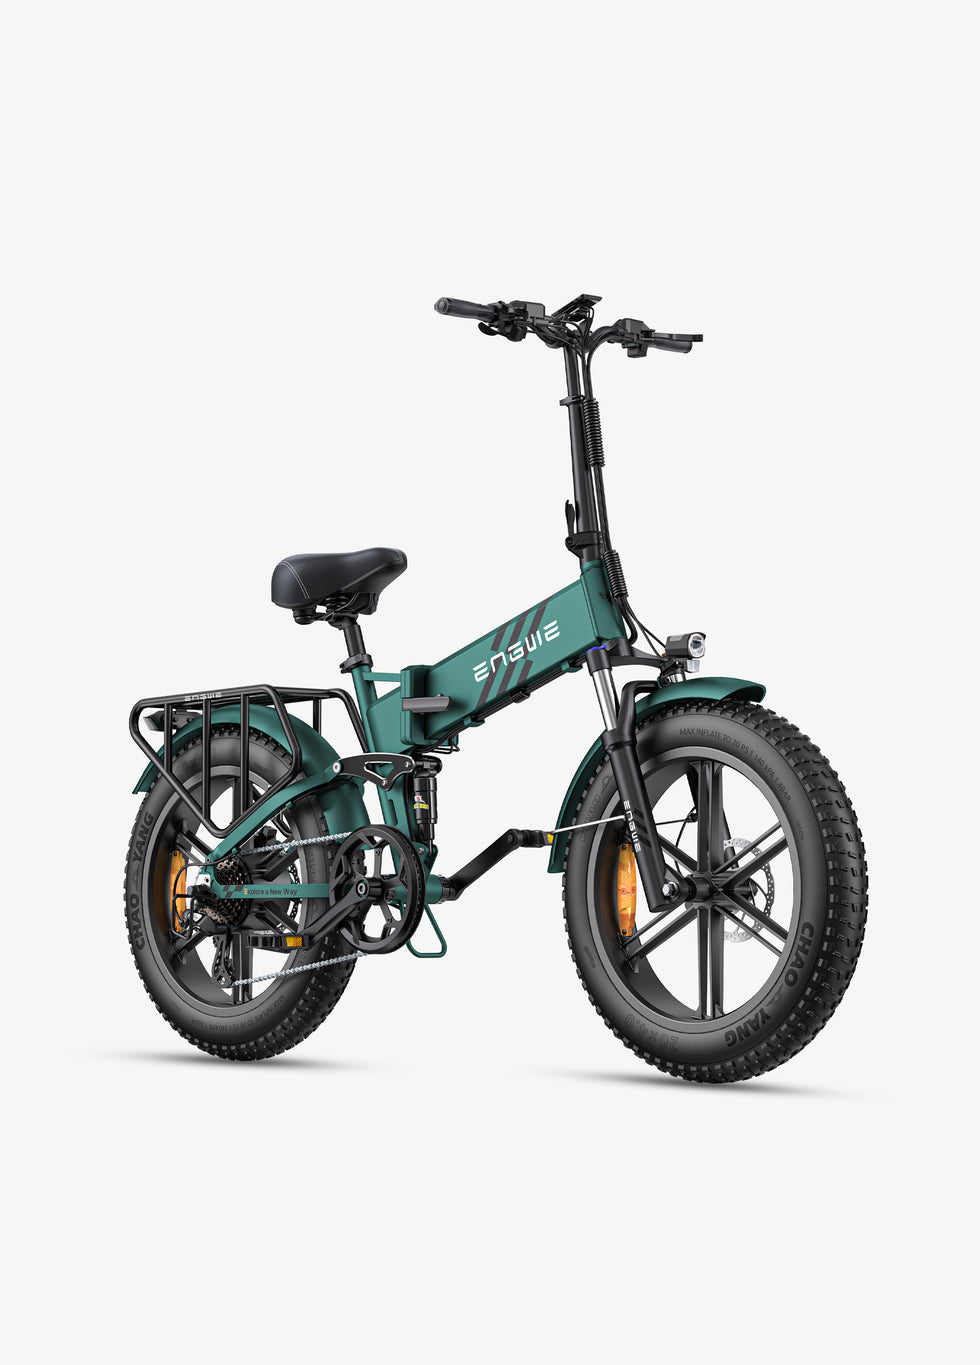
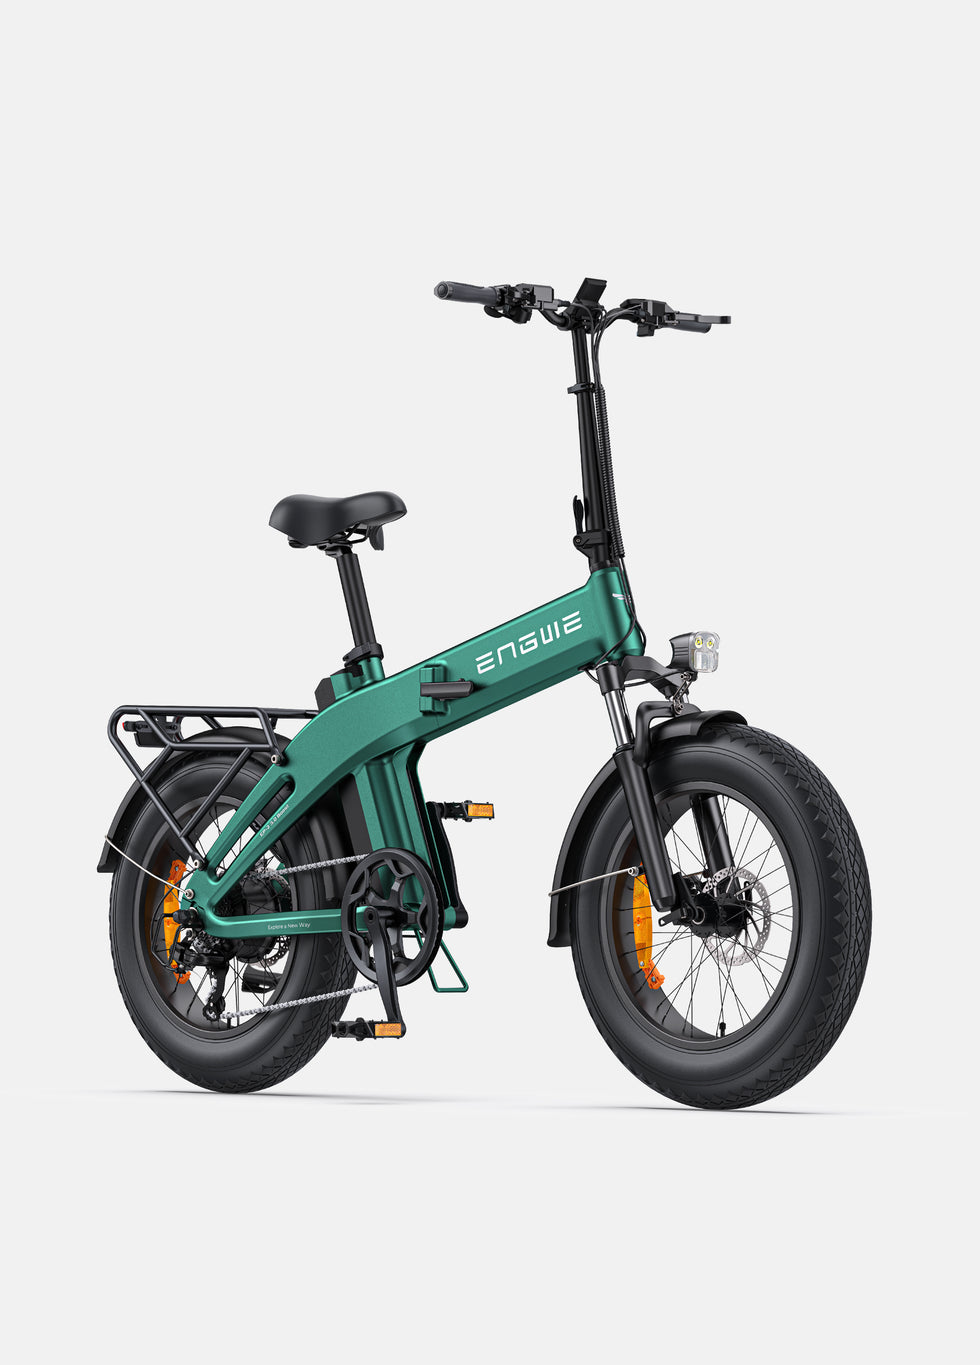
Even though a DIY project can seem simple, it entails a lot more than just assembling parts. When you factor in the cost of the materials, the time, technical skill, and the possibility that some sections might not fit or function properly, a professionally engineered and manufactured fat tire electric bike may look like a better deal. These bicycles have an integrated design, meaning that every piece has been carefully chosen and designed to operate together flawlessly. They also come with a warranty, so you can be confident that the finished product will run smoothly. For anyone uninterested in or incapable of tinkering and who wants a guaranteed, ready-to-ride solution out of the box, this option is the approach to go.
The ENGWE EP-2 Boost is the ideal e-bike for riders who want exceptional value and high-end features without any construction challenge. By combining outstanding performance with practicality, it is a worthwhile addition to the ENGWE series and a perfect alternative to a self-assembled project. The following are some of the ENGWE EP-2 Boost’s benefits:
Intelligent Torque Sensor Power Performance: Boost Mode allows you to quickly and easily obtain assistance from the 250W brushless motor, producing a burst of torque of 55Nm.
All-Terrain: 20×4.0-inch fat tires on a secure one-piece rim give confident all-terrain stability and grip for city commuting just as well as sandy adventures.
Built to Last: Max 48V 13Ah removable lithium-ion batteries ensure a top range of 120 km; the sturdy frame supports a max weight of 150 kg.
For Ultimate Convenience: The EP-2 is judiciously equipped with Shimano 7-speed gears for flexible and accessible all-terrain expeditions, and its 180mm mechanical disc brakes provide enough halting ability.


5. Hidden Costs and Essential Tools: Budgeting for the Unexpected
A truly realistic budget accounts for the expenses that lie beyond the main components list. These “hidden” costs, such as shipping, specialized tools, and essential accessories, can easily add a significant percentage to your total project cost if not planned for. Overlooking these is a common pitfall that can lead to frustration and a half-finished bike sitting in your garage. A successful builder anticipates these needs from the outset, ensuring they have both the budget and the equipment to see the project through to a safe, rideable conclusion. A contingency fund is not a luxury; it is a necessity for any serious DIY endeavor.
Key Hidden Costs to Factor In
Shipping and taxes: Batteries and frames are large, heavy items that incur high shipping fees. If ordering internationally, be prepared for import duties and taxes.
Specialized tools: Beyond a basic wrench set, you will likely need a crank puller, chain tool, and a cassette or freewheel removal tool. Investing in these makes the job vastly easier and prevents damage to parts.
Consumables and small parts: The cost of zip ties, wiring wrap, connectors, and thread locker may seem small, but they are essential for a clean, secure build.
Safety and utility accessories: A helmet is non-negotiable. Practical accessories like front and rear lights, fenders for wet conditions, a sturdy lock, and a rear rack for cargo are essential for a usable bike.
Technique: Always add a 15% contingency to your total estimated budget – this will cover unforeseen costs, a part that doesn’t fit, or a tool you didn’t realize you need.
Build Tier Examples
| Build Tier | Typical Components & Considerations |
|---|---|
| Budget | You can buy a used steel bike, a basic 250W hub motor kit, a set of mechanical brakes, and a simple LED display to use. The tools and hidden costs are low in this case. |
| Mid-range | A new aluminum frame, a 500W geared hub and a quality battery, a set of hydraulic brakes, and an LCD display can be used for the mid-range build. Then, the tools and hidden costs are moderate. |
| Performance | You can consider buying a quality donor bike, a mid-drive motor and a high-capacity battery, and a premium drivetrain & brakes. In this case, the hidden costs and tools will be relatively high. |
Frequently Asked Questions
What is the biggest mistake one can make when building an e-bike by one’s effort?
You should never save money on the e-bike battery or brakes. A cheap battery is a major safety and even fire risk, while flimsy brakes are totally unsafe on a heavy and fast e-bike with fat tires.
Can the power of a hub motor be increased?
It is possible to do this to some extent by programming the controller to generate higher torque. If you do so without sufficient expertise, the motor will overheat frequently and its working life will be seriously reduced.
If I build an e-bike on my own, does it always cost less than purchasing an e-bike pre-built?
Not necessarily. Taking into account the cost of tools, shipment, your own time, and potential mistakes, a well-engineered, competitively priced complete e-bike often provides superior general and reliable value.
Ultimately, constructing a fat tire e-bike from scratch by yourself is a fascinating adventure, but it starts with a realistic budget.